Cool Cursor Trail With JavaScript

easy

Instruction
In this tutorial, you'll learn exactly how to integrate a captivating cursor trail using custom Javascript. We'll break down the steps, making it easy for you to implement this cool effect, even without extensive coding knowledge.
The Webflow set up
This can work on any sites as long as you follow the instructions
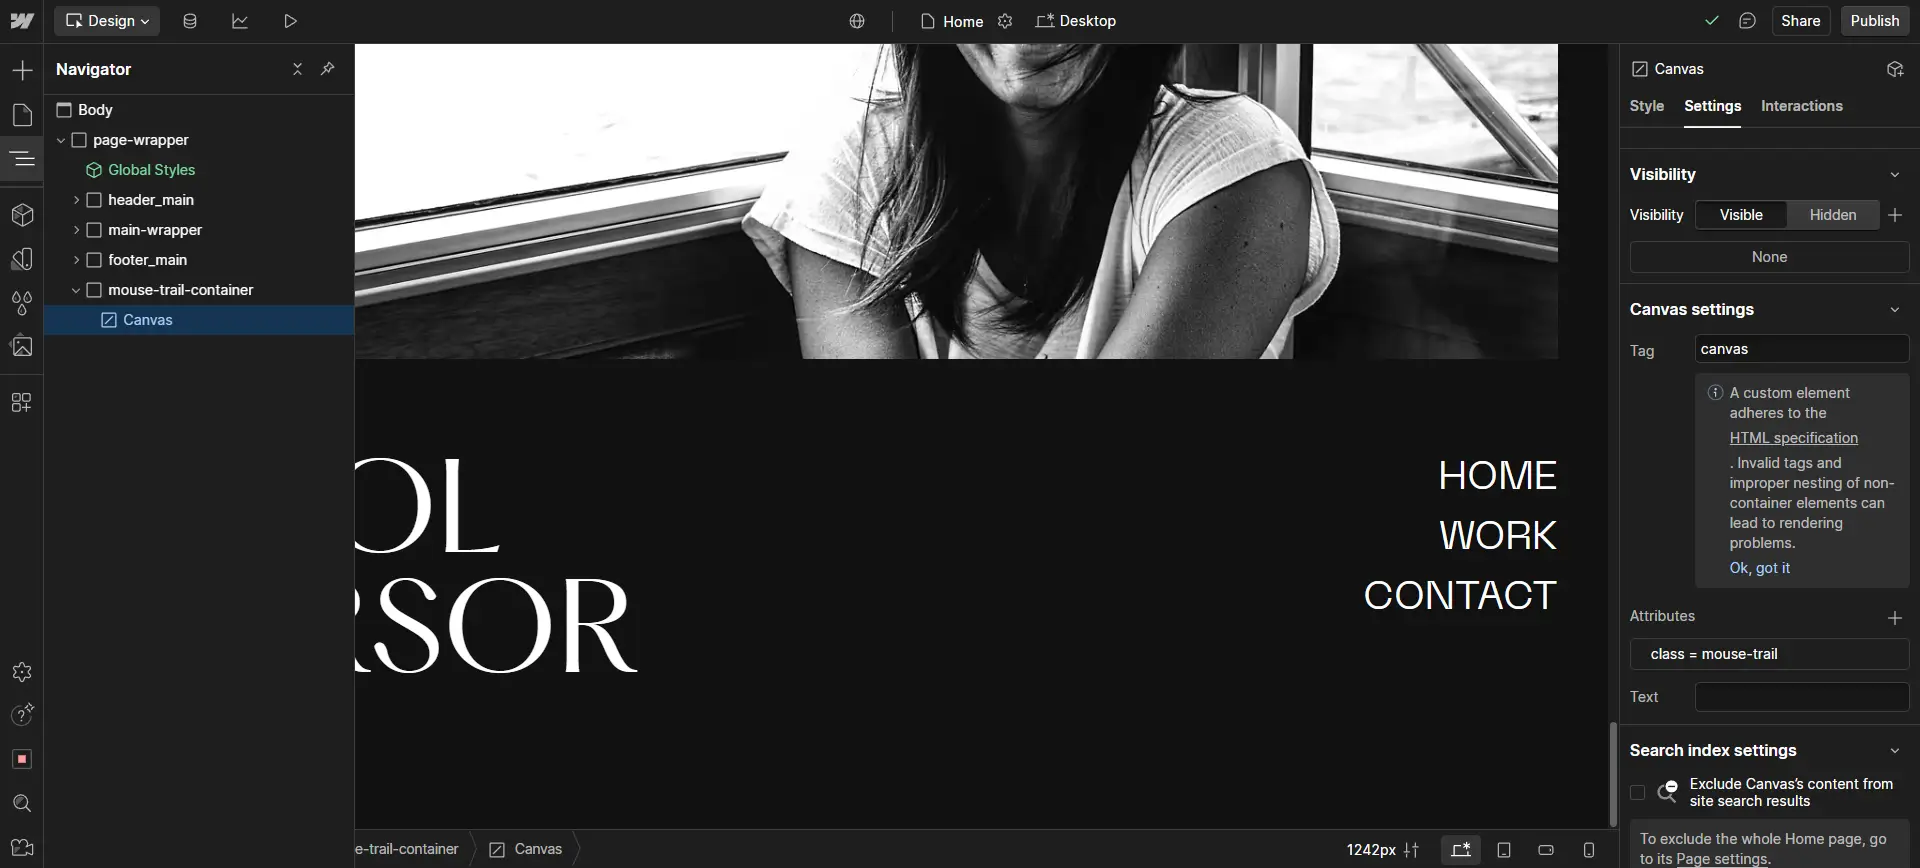
- In your page wrapper, create a
div blockand give it the class ofmouse-trail-container - In this
div block, create acustom elementthat is acanvasand that will have a class ofmouse-trail

You are all set! You made it to the Webflow setup. Now let's implement the code.
CSS Implementation
In the head of your page or site, place this CSS snippet.
<style>
      .mouse-trail-container {
        pointer-events: none;
        overflow: hidden;
        position: fixed;
        top: 0;
        left: 0;
        width: 100vw;
        height: 100vh;
        z-index: 9999;
        mix-blend-mode: exclusion;
      }
      .mouse-trail {
        position: absolute;
        top: 0;
        left: 0;
        width: 100vw;
        height: 100vh;
        background: transparent;
      }
    </style>
Well done! Let's continue with the JavaScript!
Javascript
In the head of your page or site, place the JavaScript under the CSS.
<script>
      document.addEventListener('DOMContentLoaded', function () {
        const canvas = document.querySelector('.mouse-trail');
        if (!canvas) return;
        const ctx = canvas.getContext('2d', { willReadFrequently: true });

        // Configuration object
        const config = {
          fadeSpeed: 0.05,// Modify the speed the trail fade 0.1 is fast and 0.01 is slow
          lineWidth: 70,//modify the size of the trail
          strokeColor: 'rgba(255, 255, 255, 0.9)', //Modify the color of the trail
          blurAmount: 15,  // Modify the amount od blur in the trail
        };

        // Function to update fade speed
        window.updateFadeSpeed = function (newSpeed) {
          config.fadeSpeed = parseFloat(newSpeed);
        };

        function resizeCanvas() {
          canvas.width = window.innerWidth;
          canvas.height = window.innerHeight;
          ctx.lineWidth = config.lineWidth;
          ctx.strokeStyle = config.strokeColor;
          ctx.lineCap = 'round';
          ctx.filter = `blur(${config.blurAmount}px)`;
        }
        resizeCanvas();

        let xMousePosition = 0;
        let yMousePosition = 0;
        let lastX = null;
        let lastY = null;
        let hasMouseMoved = false;
        let lastTime = 0;
        let isScrolling = false;
        let scrollTimeout;

        function getAdjustedCoords(x, y) {
          return {
            x: x - window.pageXOffset,
            y: y - window.pageYOffset,
          };
        }

        function fadeOut(currentTime) {
          const deltaTime = currentTime - lastTime;
          if (deltaTime > 16) {
            ctx.fillStyle = `rgba(0, 0, 0, ${config.fadeSpeed})`;
            ctx.fillRect(0, 0, canvas.width, canvas.height);
            lastTime = currentTime;
          }
          requestAnimationFrame(fadeOut);
        }
        requestAnimationFrame(fadeOut);

        function drawLine(newX, newY) {
          const adjustedCurrent = getAdjustedCoords(newX, newY);
          const adjustedLast =
            lastX !== null ? getAdjustedCoords(lastX, lastY) : null;

          if (adjustedLast === null) {
            ctx.beginPath();
            ctx.moveTo(adjustedCurrent.x, adjustedCurrent.y);
          } else {
            ctx.beginPath();
            ctx.moveTo(adjustedLast.x, adjustedLast.y);
            ctx.lineTo(adjustedCurrent.x, adjustedCurrent.y);
            ctx.stroke();
          }

          lastX = newX;
          lastY = newY;
        }

        document.addEventListener('mousemove', (e) => {
          if (!hasMouseMoved) {
            hasMouseMoved = true;
            lastX = e.pageX;
            lastY = e.pageY;
          } else {
            xMousePosition = e.pageX;
            yMousePosition = e.pageY;
            if (!isScrolling) {
              drawLine(xMousePosition, yMousePosition);
            }
          }
        });

        window.addEventListener('scroll', () => {
          isScrolling = true;
          if (lastX !== null && lastY !== null) {
            // Update the line position during scroll
            drawLine(lastX, lastY);
          }

          // Clear the timeout if it exists
          clearTimeout(scrollTimeout);

          // Set a new timeout
          scrollTimeout = setTimeout(() => {
            isScrolling = false;
            if (lastX !== null && lastY !== null) {
              drawLine(lastX, lastY);
            }
          }, 50);
        });

        window.addEventListener('resize', () => {
          resizeCanvas();
          ctx.clearRect(0, 0, canvas.width, canvas.height);
          lastX = null;
          lastY = null;
        });

      });
    </script>
Congratulations! You just implemented the cursor. Now publish the site, and it is done.
Customising the Cursor
In the JavaScript there is a config variable that allows you to make modifications to the cursor.
Example:
 // Configuration object
        const config = {
          fadeSpeed: 0.05,// Modify the speed the trail fade 0.1 is fast and 0.01 is slow
          lineWidth: 70,//modify the size of the trail
          strokeColor: 'rgba(255, 255, 255, 0.9)', //Modify the color of the trail
          blurAmount: 15,  // Modify the amount od blur in the trail
        };
fadeSpeedmodify the speed the trail fade 0.1 is fast and 0.01 is slowlineWidthmodify the size of the cursor widthstrokeColormodify the color of the trailblurAmountmodify the blur of the the trail
Play around with it and you will see the cursor change
Happy Webflowing!
Other Code Snippets
Let’s Talk About
Your Web Journey
Hit the button to let me know what you have in mind, and I will be happy to advise you on how we can move forward together to reach all your goals.
